For a simple home or small office network, you can choose among four types of network connections:
10/100BASE-T (Fast Ethernet) over high-quality CAT-5 unshielded twisted-pair (UTP) cables—
These cables look like telephone cables, with a fatter version of a
telephone modular connector at each end. This networking scheme is dirt
cheap and ultra-reliable.
1000Mbps (Gigabit) Ethernet over CAT-5E cables—
These cables look like CAT-5 cables, but they are capable of carrying
the higher-speed signals required by Gigabit Ethernet. The higher speed
is great, and worth the extra cost, if you routinely back up hard disks
or copy huge video files over your network. You’ll often see Gigabit
Ethernet referred to in computer specs as 10/100/1000 Mbps.
Phoneline or powerline networking—
You can purchase network adapters that send data signals between your
electrical outlets, or between telephone jacks that are wired to the
same phone extension. Its popularity is fading due to the rise of...
802.11n or -g wireless networking—
Wireless networking sends data over a radio signal, so no cabling is
necessary. It’s much easier to set up, but it can’t be used over long
distances, and in some buildings the signal might not go as far as the
advertising leads you to believe it will.
Tip
If your network is small
and/or temporary, you can run network cables along walls and desks.
Otherwise, you probably should keep them out of the way and protect them
from accidental damage by installing them in the walls of your home or
office. As you survey your site and plan your network, consider how the
network cabling is to be routed. |
For the average small office or home network, any
of these four options will provide perfectly adequate performance. In
the following sections, I go over each type in a little more detail.
Then, I discuss additional network features you might want to consider,
such as printing and Internet connectivity.
If
for any reason you are unable to drill through walls or ceilings to
install network cables, you can install wires along baseboards, around
doors, and so on. It’s not as pretty, but because network wiring is low
voltage, it’s not as risky to do so as it would be with power wiring.
(My office has a cable shamefully strung through a skylight, across the
ceiling, and into a closet.) You also can use products called wiring
channels to conceal the wires that run along baseboards and use rubber
guards to protect them where they might be trod upon. You can find these
products in the hardware store or in business product catalogs. Of
course, you can also consider using a wireless network. |
|
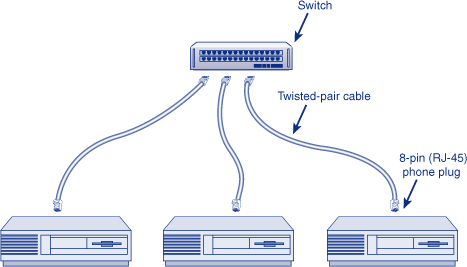
10/100BASE-T Ethernet
10/100BASE-T
Ethernet networks use unshielded twisted-pair cabling (commonly called
UTP or CAT-5 cable) run from each computer to a device called a switch
or router, as shown in Figure 1.
Note
You might have heard
these connecting boxes called “hubs.” Hubs and switches do the same job
of passing data between the network’s computers, but hubs use an older
technology.
|
The 10/100 part of the name means that the
equipment can run at 100Mbps, but it can automatically slow down to
10Mbps if it’s connected to older 10BASE-T equipment.
The cables look like telephone cables, and the
connectors look like fat versions of telephone modular plugs, but it’s a
dangerous comparison, because the electrical properties of the cables
and connectors are specifically tuned for networking, and ordinary
telephone wiring will not work.
Tip
Multiple switches can be
connected if your network grows beyond the capacity of your first
switch. So, you can add on instead of entirely replacing your original
equipment. |
These networks require that you use cable and
connectors designated “CAT-5” or better. They have labels on the wire
that state this clearly. CAT-5, CAT-5E, and CAT-6 are all fine.
A cable is run from each computer to a switch,
which is a small connecting box that routes the signals between each
computer. You need to get a switch that has at least as many ports
(sockets) as you have computers, plus a spare or two. 10/100BASE-T
switches cost roughly $5–$10 per port.
10/100BASE-T
network interface cards (NICs) are available for as little as $5 each
(if you catch a sale) and are made by companies such as Intel, 3Com,
NETGEAR, Farallon, SMC Networks, Kingston Technology, D-Link, Linksys,
Boca, and CNet. Most generic brand, cheap-o NICs are based on one of a
handful of standard circuit chips, so they’ll usually work just fine,
even if they’re not listed in the Windows Compatibility Center at www.microsoft.com/windows/compatibility.
Note
Add-on adapters come in
three styles: internal PCI cards for desktop computers; external
adapters that you connect with a USB cable; and thin, credit card–sized
PCMCIA (PC Card) adapters for laptops. You may not need to add one,
though: Many modern computers already have a 10/100 or 10/100/1000
Ethernet adapter built in, with a socket on the back of the computer
box. |
Overall, 10/100BASE-T networking is as
inexpensive as it gets—hooking up three computers should set you back
less than $75, maybe much less. It’s easy to set up, and it’s very
reliable. On the down side, though, you do need to run those wires
around, and any connectors and wall data jacks need to be CAT-5
certified as well. If you use in-wall wiring, the work should be done by
someone with professional-level skills.
Tip
Even if you’re not going
to set up a shared broadband Internet connection, I recommend that you
buy an Internet connection sharing router instead of a plain switch,
just to get the DHCP service it provides. On sale, these routers cost no more than a plain switch. In
fact, as I wrote this, my newspaper had an ad for a router for $20 with a
$20 mail-in rebate. |
1000Mbps Ethernet (Gigabit Ethernet)
Ultra-high-speed Gigabit Ethernet networking is
probably overkill for most home and small office networks, but it’s
making an appearance in the corporate world and in some fields such as
medical imaging and digital movie production. Gigabit speed can also
help if you back up your hard disk over your network, or copy large
video files. The cost is so low now that some new PCs and all Macs now
come with 10/100/1000Mbps Ethernet adapters built in as standard
equipment.
If you want to use Gigabit Ethernet, you need to
use CAT-5E or CAT-6 certified connectors and cabling; CAT-5 gear won’t
cut it. You should use only commercially manufactured patch cables or
professionally installed wiring. Most Gigabit switches can run any port
at 10-, 100-, or 1000Mbps, so not all of your computers need to use the
more expensive cabling and adapters.
Note
Most cable/DSL-sharing
routers have 10/100Mbps switches built in. Your Gigabit adapters will
run at 100Mbps—one-tenth of what you are paying for—if plugged into a
10/100Mbps switch. If you want your computers to communicate with each
other at Gigabit speed, but you have a slower connection sharing router,
plug your computers into a 10/100/1000Mbps (Gigabit) switch using CAT-6
cables and then connect the switch’s “cascade” port to your
cable/DSL-sharing router. |
Phoneline and Powerline Networking
HomePNA Alliance devices send network data by
transmitting radio signals over your existing telephone wiring, using a
network adapter that plugs in to a telephone jack (see Figure 2). These devices don’t interfere with the normal operation of your telephones; the extra signal just hitchhikes along the wires.

Phoneline networking is intended primarily for
home use. The products are relatively inexpensive—about $70 per
computer—and don’t require you to string cables around the house.
However, they have some disadvantages:
All your adapters must be plugged into
the same telephone line. So the same extension must be present at a
phone outlet near each of your computers. If you need to call in a
wiring contractor to add a phone extension, you haven’t saved much over a
wired network.
“Access point” devices, used to link a standard wired-networked computer to your phoneline network, are relatively rare.
10Mbps
is fine for sharing an Internet connection or printers, but you’ll find
that it’s too slow to back up a chock-full hard disk over your
network—it could take days!
Tip
If you use phoneline
networking, be certain to get only HomePNA 2.0–compatible adapters or
better. This will ensure that your equipment will operate at least at
10Mbps and will work with other manufacturers’ products. Don’t get any
device that connects through your computer’s parallel port: It’s too
slow. |
Without a hardware access point, it’s difficult
to use a hardware Internet Connection Sharing device or to add standard
wired computers to your network. However, Windows 7 can manage it in
software, if necessary.
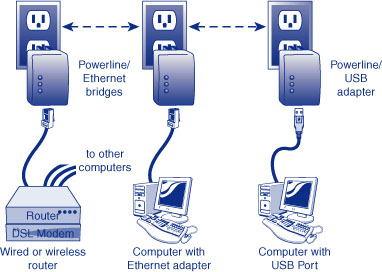
HomePlug
(HomePlug Powerline Alliance) adapters work in a similar fashion,
sending signals through your electrical wiring, and are plugged into a
wall socket. These also provide 10Mbps performance, and they are more
flexible than the phoneline system because you don’t need a phone jack
near your computers—just a nearby electrical outlet.
In addition, you can get HomePlug devices called
“bridges,” which are specifically designed to link a wired network to
the powerline network, for about $60—the Linksys Powerline EtherFast
10/100 Bridge is an example. This means you can easily add a shared
Internet connection sharing router or mix in wired computers. Figure 3 shows how this would look in a typical home network.
802.11g and 802.11n Wireless Networking
One way to build a network without switches,
cables, connectors, drills, swearing, tools, or outside contractors is
to go wireless. Blocks of radio frequencies in the 2.4GHz and 5GHz bands
are reserved for close-range data communications, and standardized
products from cordless telephones to computer networking devices are now
available to take advantage of this. Prices have fallen to the point
that wireless connectivity is now competitive with wired networks, even
before the installation cost savings are factored in.
Today’s high-speed 802.11g equipment operates at
up to 54Mbps and is compatible with older 802.11b (11Mbps) equipment.
Some manufacturers offer Wireless-G equipment that operates at up to
108Mbps. This is great, but you should know that you’ll get the speed
boost only if you buy all your equipment from the same manufacturer (and
even then, you need to read the packaging carefully to see if the
double-speed function will work with the particular parts you’re
buying).
At the time this was written, a newer version of
wireless networking called 802.11n was in the final stages of getting
industrywide approval, which has been a tortuous, long-delayed process.
“Wireless-N,” as it’s called, offers even higher speed and greater range
than Wireless-G. When the industry approval comes, you may want to
check to see if Wireless-N is a good option for your network. Until that
approval is finalized, though, be wary of buying the “Pre-N” equipment
being sold. It might work with equipment designed according to the
final, official specification, it might require a software update, or it
might not work at all.
Note
You might also read about
802.11a equipment. “Wireless-A” is used mainly in corporate
environments and is much more expensive than the more modern Wireless-G
equipment that I recommend. |
Wireless-G networking products typically
Give actual throughput of about half the advertised speed.
Can transmit data about 100 feet indoors and up to 300 feet outdoors. (Wireless-N should go about 50% farther.)
Are available for both desktop and laptop computers, in PCI, PCMCIA (PC Card), or USB formats.
Cost $25–$70 per adapter.
Can
be bridged to a wired LAN through an optional device called an access
point, router, bridge, or base unit, costing $20 and up. (That’s not a
typo: $20, if you catch a good sale. $40 may be more typical without a
sale.)
Usually don’t work well between floors of a multistory building.
Tip
Whether or not you decide
to set up a shared Internet connection, you’ll save time and money by
using a wireless Internet connection sharing router as your network’s
access point. A router includes a DHCP server (more on that later) that
simplifies setting up your network. |
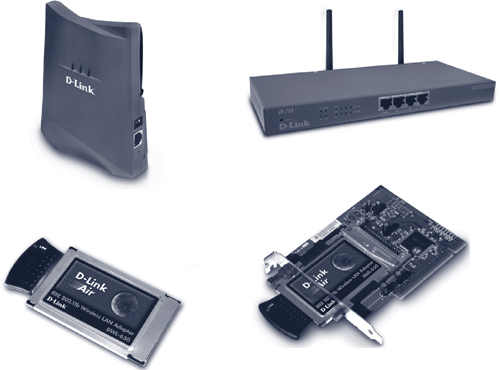
Figure 4
shows a typical family of wireless products: a wireless access point
(Ethernet bridge), a wireless router that can also share a DSL or
Internet connection, an internal wireless network adapter for desktop
computers, and a PCMCIA adapter for laptops.
Mixed Networking
If you are updating an existing network or are connecting two separate types of networks, you should consider several things.
If you have some existing 10Mbps-only devices
and want to add new 100Mbps devices without upgrading the old, you can
buy a new dual-speed (10/100) switch, which connects to each computer at
the maximum speed its adapter permits. Read the specifications
carefully. You want a switch, or a hub that’s labeled “N-way
autosensing.” Be sure to use CAT-5 certified cables to connect to the
100Mbps devices.
Finally, if you want to mix standard Ethernet
and wireless devices on your network, you can use the Bridging feature
built into Windows 7, or you can use one of the bridges or access points
I mentioned earlier.